What is construction?
Also known as filling in high spots, it generally addresses issues such as softness, warping, and unevenness. By applying high-hardness extension gel or medium-hardness reinforcement gel, and reinforcing the gel with a higher-hardness base gel, the nail surface is curved into a parabolic curve, achieving a flat and firm nail.
Construction is divided into two types: pre-construction and post-construction.
Pre-construction is used to strengthen the base nail surface, reusing the original nail surface (a layer of residual material), or addressing thin and soft nails. Back construction is used to fill in and level the nail surface due to uneven application caused by technical or gel quality issues. It is also used to level and reinforce accessories such as sequins and improve the curvature of the aperture.
What is the purpose of nail construction?
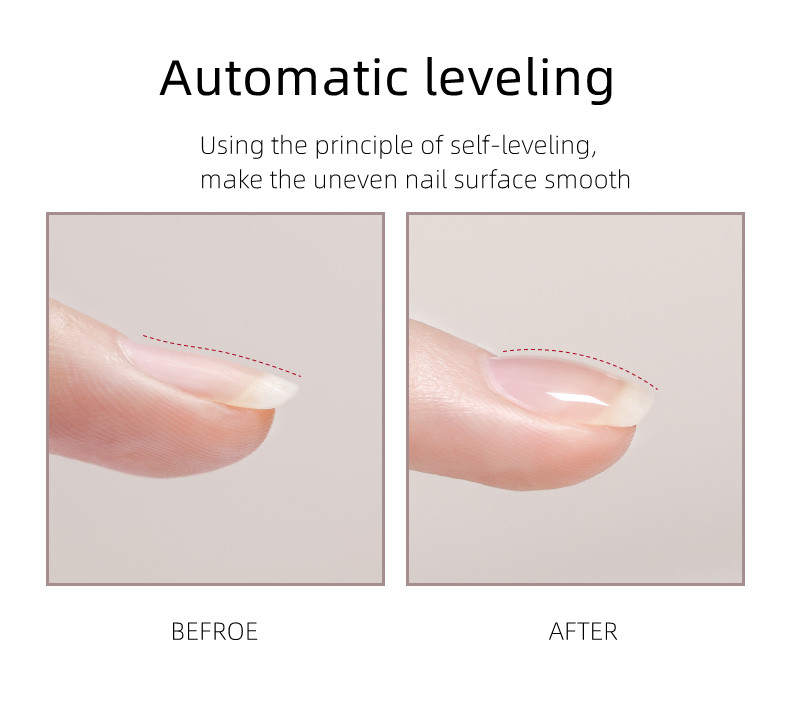
① keep a smooth surface.
② Strengthens weak and easily broken nails.
③ Shapes and narrows the nail while simultaneously shaping the curvature of the nail surface.
④ Compensates for imperfections on the nail surface, improving flat, concave, curved, or curved nails.
⑤ Uneven application of color gel and thicker styles require coverage to enhance the sophistication of the nail art.
⑥ Severe damage to the nail caused by unprofessional nail art techniques or excessive polishing when frequently changing styles.
Who is the nail construction suitable for?
① People who regularly get manicures
② People with thin nails
③ People with naturally soft nails that break easily
④ People with sensitive nails that feel pain when buffing
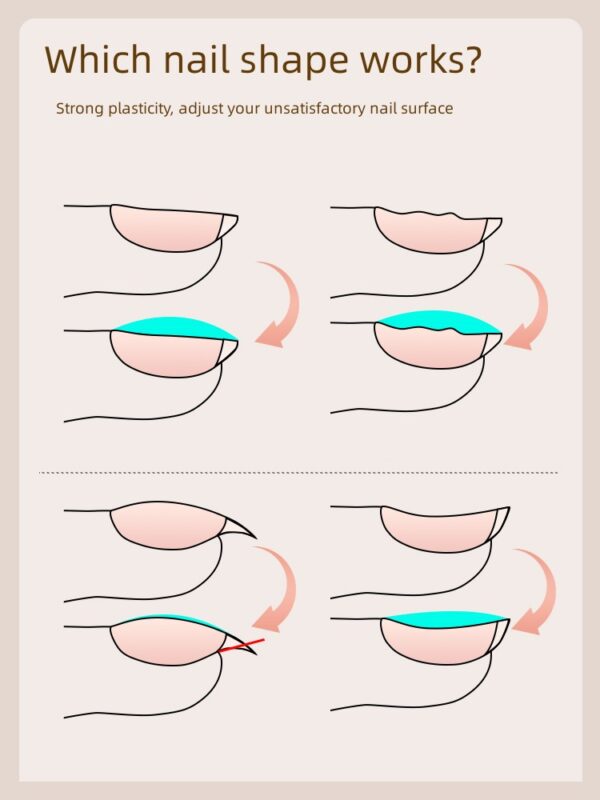
⑤ People with flat nails
⑥ People with upturned or underturned nails who need to correct their nail shape
When is pre-construction necessary? When is post- construction necessary?
pre-construction: Build first, then color gel.
① If the nail surface is thin, soft, uneven, or curved, front construction is necessary to level it.
② Need to left one layer for base.
③ Before extension nails , pre-construction is necessary to level it.
④ For designs like cat-eye or matte nails, pre-construction is necessary (post- construction will make the design unclear).
Post-construction: First, apply color gel, then construct.
① color gel, uneven patterns (such as glitters, etc.)
② Those who demand exquisite manicures will undergo post-construction, and the shape of the light reflected from the surface will be used to determine whether the curvature of the nail surface is perfect.
The essence of the construction theory is to build high points.
For short nails, the construction high point is halfway up the nail bed. For long nails, the construction high point is one-third of the way along the posterior edge of the nail.
As the nail grows, the high point continues to move forward until removal in the third or fourth week. Therefore, maintaining a safe pressure range on the nail is crucial, which is why construction is so important.
How do it:
①Apply gel using the Z-drawing method
This method is more challenging for the beginners. The speed of the gel is slow, and the gel tends to flow to both sides. It is necessary to turn your hand upside down to adjust the highest point of the gel pile , which is not easy for the beginners to operate.
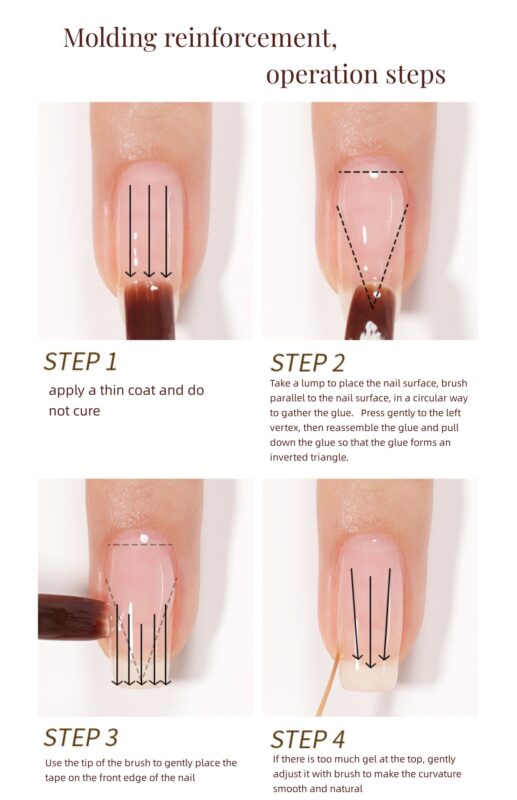
② Inverted Triangle Gel Application
This technique is easy for beginners. Once the gel is applied, simply turn your hand upside down to control the shape. Today, we’ll explain in detail the inverted triangle gel application method and key steps:
- Thinly apply extension gel to define the border. Without curing, place a patch of extension gel about halfway up the nail surface. Using a brush parallel to the nail surface, gather the gel in circular motions. Gently press toward the left and right vertices, then gather the gel again and pull it downward to form an inverted triangle.
- Use the tip of a threading pen to gently move the tape at the base toward the front edge.
- Use a threading pen to gently adjust any excess gel to create a smooth, natural curve.
- Turn your hand upside down to control the gel and cured.